Have you thought about entering the beautiful world of Diamond Painting? Do you want to know how to do it before you start? Then you have found the right place! This is the first part of an in-depth instruction on how to do it. First out is inventory. You will learn what to go through and check when you receive your Diamond Painting kit. The reason why you want to check that everything is included is so that you can contact the seller at once if something is wrong. Keep in mind that there is no right or wrong way to do the inventory. This is my way and I want to show you what you need to think about when you get your Diamond Painting so you don’t miss anything.
Right motif and size
We start the inventory by opening the package and looking so that we have got the right motif. You do not need to roll up the canvas to see the picture. You can see it in one corner while the canvas is still rolled up. See image below for what it might look like.
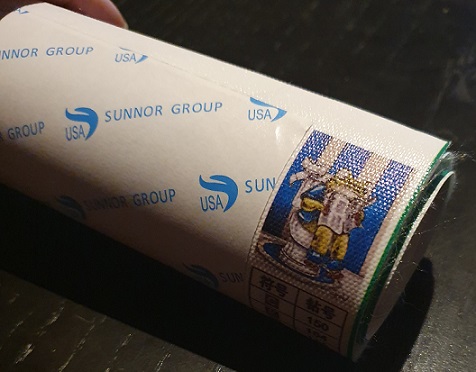
When we have ensured that we have the right motif, we check so that we have the drills and the right size of the canvas . You do not need to look at the drills more closely right now as we will look at them later. Now you just need to check whether there are any drills in the package or not. Also, make sure you have the correct size of the canvas. It’s not fun to start on a painting just to realize that they sent a size smaller than what you ordered. The size usually stands on the canvas, but if it does not, you can always measure the canvas yourself.
Tray, pen and wax
To be able to do your Diamond Painting you also need some accessories. You get these with your kit. It is a tray, a pink pen (can also be white) or tweezers and a piece of wax (can be pink or blue). If this is in the package, you can be sure you have the tools you need. We will go deeper into the accessories in a later post.

The right number of different colors
When you see that you seem to have everything, you need to make sure you have the right number of different colors. Start by putting the bags with the same number together. It makes it easier if you put them in numerical order. Calculate how many different colors there are. Then find the symbol chart. It can either be on a paper sheet or printed on the canvas. When you find the symbol chart look at it and see how many colors it should be in total. Does the number correspond to how many different colors you got when counting the bags? Well, then you have found that you have the correct number of different colors. The painting below has 40 different colors, as you can see in the first column with the numbers 1-40 listed.

Right colors
Now let’s go over to make sure the colors you have got are the right colors. Start at the top of the symbol chart with number one. Locate the column with the DMC number and then locate the bag with that number on. The bags that the drills come in may have a slightly different appearance but there should be DMC numbers on them. See image below for what it might look like.
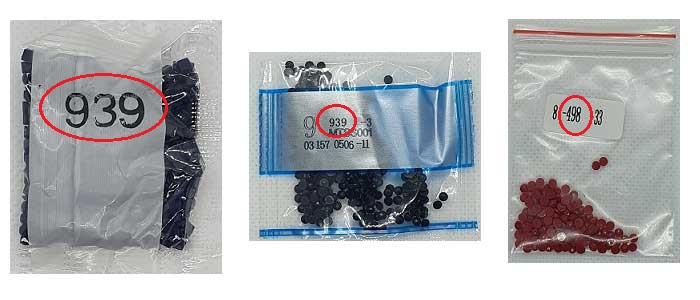
When you have found the DMC number on the bags, just compare with the symbol chart so that you have bags for all the different colors.
The right number of drills
This is the slightly more complicated part of the inventory, but don’t worry if you know how to do it it will be no problems. The symbol chart shows how many drills are needed for the painting. It also says how many bags you got of each color. This means that you do not have to count all the drills one by one. The bags are usually available in three different sizes which you can see in the picture below. The number of bags on the symbol chart usually indicates the smallest size. The ones containing about 200 drills.
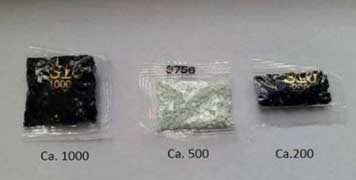
Look at your symbol chart and start with the first color. Take all the bags marked with that DMC number and place in a pile. Count how many bags you have in your pile. Look at the symbol chart and the line for the current color. In the picture below you can see that for this painting you need three bags of DMC number 645. As you can see I have received three bags marked 645. Which means that I have received enough drills to be able to finish the painting.
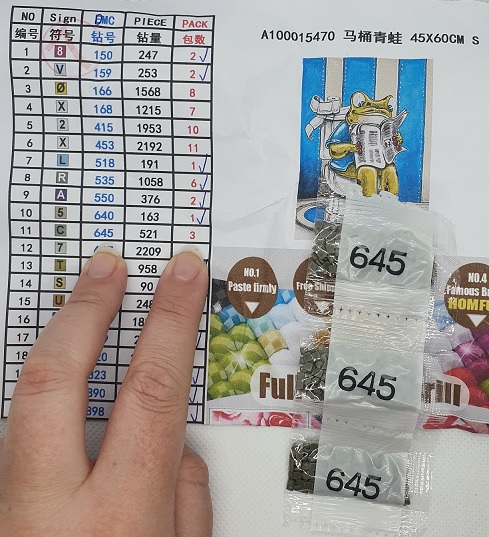
Now I usually do one last check. Do you remember that I mentioned that the symbol chart shows how many drills you need? If you look at the picture above and on line 11 (where my fingers are), the number of drills is in the second to last column. Thus, 521 drills of DMC 645 are needed for this painting. We have received three bags with 200 drills in each bag. If you take 200 times 3 then you get 600. Which means I have received 600 drills. That means I got a lot of extra drills for the painting because I “only” need 521.
Drills in zip-bags
If you got the drills in a zip bag instead of the wrapped ones, then the seller probably goes by weight instead of a amount. If the seller uses weight then the bags are usually 2 grams, 5 grams or 10 grams. A bag of 2 grams contains about 300 drills, 5 grams of 700 drills, and 10 grams of 1400 drills. This obviously makes the inventory a little more complicated since you cannot count the number of bags, but instead you can weigh them. If you weigh a bag and its weight is 7 grams. Here’s how you can count: 2 grams bag + 5 grams bag = 7 grams. A bag of 2 grams contains 300 drills and a bag of 5 grams contains 700 drills, 300 + 700 = 1000. So if you have a bag with 7 grams it should contain about 1000 drills.
Lastly
If you have gone through all the steps above and everything is correct then the inventory part is over. Now you can be sure you have everything to begin your Diamond Painting. If something is missing or incorrect, contact the person you purchased the painting from for assistance. I hope you find this post both informative and educational. More posts will appear with more in-depth information on how to do Diamond Painting in the future.





I have a cross stitch pattern I would like to do with diamond dots. There are 78 colors by skein with over 80,000 squares. How do I determine how many dots of each color I need without having to count them all individually? I don’t mind over estimating but it is prohibitive to count each square by color (it will take weeks). Any help on this is greatly appreciated.
You can find information here Cross stitch pattern into Diamond Painting.
/Josefine, All about Diamond Painting